Seyella Mitts: Embroidery Tutorial
Issue 10: Autumn 2014 contains several bi-craftual patterns, including the lovely Seyella mittens by Sarah Heys. These classic mittens knit up in no time and feature a beautiful embroidery pattern. Not to worry if you have never embroidered before, here is a handy tutorial to get you started...

1. Knit your mittens, find a needle and collect your choice of colours for the embroidered design. To keep the design in the centre of the mitten, mark the middle and outsides with extra thread. Use a basic running stitch that can be easily pulled out afterwards. We’ve marked an area that’s 19 stitches across.

2. We’ve picked the middle of the flower as a focal point to start with. Make three stitches to determine the height and width and then fill in the space with the satin stitch technique.

3. Repeat this process to build up the rest of the flower.

4. After completing the flower, use back stitch to finish the smaller details. Using one colour at a time, carefully distribute the stitches evenly.

5. For the leaves, start with a centre point and use backstitching to outline the shape. Mirror that shape on the other side.

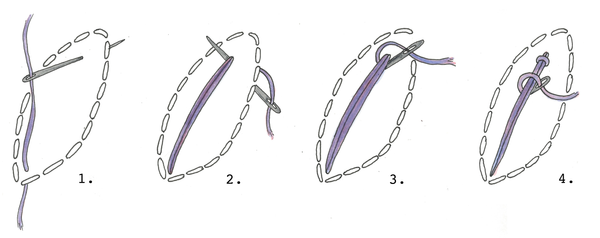
6. Make two long stitches in the centre of the leaf. The couching stitch is then done by coming up underneath the long stitches, over top and back down through the same hole. Repeat this three more times evenly across the long stitch.

7. The last part is a combination of backstitch and satin stitch. By using backstitch, create the shape and then fill it in with satin stitch.
Here are some step-by-step illustrations to get you on your way. Once you've mastered these basic embroidery stitches the possibilities are endless! Share your colour combinations with us on Ravelry. Happy Stitching!
Couching Stitch
Backstitch

Satin Stitch
